Thursday, January 28, 2016

New pattern, the Cindy Blouse

It's official!  The 7th Paganoonoo pattern, The Cindy Blouse, is now for sale on ETSY.

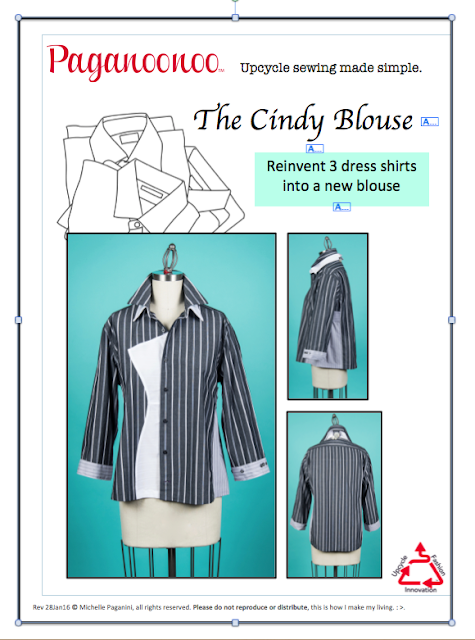
This blouse has a high-low hem, roomy hips, 3/4 sleeves with cuffs and a double collar (double collar pattern included with purchase.) The side panels are upside down sleeves. The three shirts are mixed for a color-blocked effect. 

The cover version was made with 3 men's dress shirts. The curvy decorative panel really catches the eye.  

Perfect with slacks, jeans, a pencil skirt, or skinny pants.  Looks particularly good in bold stripes with a high contrast decorative panel and collar. 

As Always, Happy Upcycling!

Michelle

******
P. S. Thank you Jessica for making this the best illustrated Paganoonoo Pattern to date! 


Wednesday, January 27, 2016

Cindy Blouse Cover Version


The Cindy blouse is almost done!!!!  Here is the version that will be on the pattern cover.  I adore the high contrast white on grey and the stripes, plus the double collar.

 
I'm working on the very last illustrations for the pattern, it's been proofed, and cross your fingers, it will be posted on Etsy and Craftsy tomorrow.  

The design is really flattering.  I've made smalls through XXL and they look great on everyone. I'll make an official announcement once the pattern is for sale.

Post Script - it's released! 


Sunday, January 24, 2016

Jude Modeling a Modified Paganoonoo Sandy Blouse

Check out my Mom Jude (inspiration for the Judy flower) wearing a modified version of the Paganoonoo Sandy Pattern. Doesn't she look fantastic!  I like this version so much I'm thinking about altering the front of the pattern to this style. 
Thanks Mom!
Happy upcycling to all!  Michelle

Thursday, January 21, 2016

Upcycled pin cushion: Cashmere, Velvet, and Leather

 Some years ago I made myself a wrist pin cushion using ribbing from a sweater for the cuff.  I made the cushion with a bit of moss green silk velvet from a 
Thai Silk scrap grab bag. (FYI - the Los Altos, CA, store is out of business.)

As you can see the cuff had gotten ragged.
It was
 loose and rolling around on my wrist. 
The cushion is still great.
So I removed the old cuff, and auditioned some new ones. 
When I upcycle sweaters I save the cuffs and bottom bands. 
I chose a luscious double layer red cashmere, measured my wrist and cut a strip of cashmere. I sewed one end on with a whip stitch.  Then the other* 

*I forgot to take a picture but under the Getta Grip Clips and cashmere, you can just see the patch of leather* I glued onto the back to keep pins and needles from poking my wrist. This method works like a charm to guard the wrist. Previously I had sewn a leather patch underneath the cuff but I think this will work better and it requires less hand sewing.

*The leather came from FABMO, a .org distributor of designer showroom samples, located in Mt View, CA. Amazing stuff diverted from the landfill.
After I put the glue on, I stacked a box of crayons on it.  When I started to work on it later that day I noticed the glue was still wet on the edges, hence the clips.

Did you know that if you cut apart old pincushions before tossing them you will find a million missing needles in the middle? Often when I can't find a needle I just squeeze the silk velvet until one pops out. 


Tomorrow I will be able to use my beloved wrist cushion again.  I'll keep replacing the cuffs as long as the cushion holds out.
Here is another wool ribbing pin cushion.  In this case it was very thick felted wool with no stretch.  I rolled a tiny bit for the middle and just kept going. I hand sewed the bottom together and then the top outside edges.  I love how heavy it is because it stays put.


And lastly my cutest wool pin cushion.  I bought it from BackStitch Chicks on Etsy but they don't seem to be stocking their store anymore. 

It is really cute and I can hardly bring myself to put pins in it, 
so it is perched on the extra thread spindle on top of my sewing machine 
and is mostly reserved for hand sewing needles. 

Happy Upcycling,

Michelle


Wednesday, January 20, 2016

Pilled Plaid

 When I was making the Cindy pattern prototype I looked through my 150+ shirt collection for colors to use.  I found a orangish-yellow solid and needed something to pair it with.  

I found a match but was hesitant to use this shirt because the flannel was pilled.  I decided to give my d-fuzz-it tool a chance to work magic. Looks like new! I hadn't used this tool on a woven before but I can clearly see it is effective on flannels. 
 I normally eliminate pilled garments as a possibility and don't buy them unless they are wool, which happens to clean up beautifully. I was surprised I'd purchased this shirt as the fabric quality is not that great (woman's shirt, typical) and I'm guessing that I could not resist the color combo despite the not-so-great quality fabric.  Glad I did.

Happy Upcycling, Michelle

Tuesday, January 19, 2016

Design Features - comparison, Cindy Blouse

I'm working on the sample garment for the "Cindy" pattern cover.  

No I did not make two, I've created a mirror image.  The design has a decorative panel on the front that echoes the silhouette of bust, waist, hip. I typically work with men's dress shirts, but for this sample I used a woman's dress shirt.  Why does that make any difference? Drumroll please... they button on opposite sides!

My design intent is that the panel be on the left side. Looking at the image below, any guesses as to why?


If you read left to right (not all cultures do) then you look at the garment left to right too. And with the decorative panel on the left the garment is divided by the color blocking in a very flattering way, making the wearer look slimmer. 

With it on the right side the eye has to travel over more territory until it gets to the color blocking, losing the "slimming" effect. 

Since I started this sample with a woman's garment and was well into it before I caught the difference I went ahead anyway.  

It's quite instructive to see the two versions side by side.  I added the mock flower in an attempt to balance the color blocking, but it doesn't really solve the problem. Arrrgh  


Speaking of sides, here is the actual side which is also color blocked.  


Happy Upcycling, 

Michelle


Monday, January 18, 2016

Behind the Scenes Peek and Introduction to Jessica Hurst, Assistant Extraordinarie

Paganoonoo is growing!  

Jessica Hurst, queen of vintage clothing, jill of many trades, official Paganoonoo illustration guru and sanity checker, is transforming business practices at Paganoonoo!!!! 


Paganoonoo has a goal to engage every stitcher in the world with a successful upcycling experience, giving them a new tool for their sewing toolbox, and exponentially increasing the number of garments kept in use and out of the land fill.

We have a commitment to producing highly useable patterns, with plenty of step-by-step instructions and illustrations. 

Michelle drapes the designs, working on prototypes until the steps are reduced to the best methods. Each illustration starts out as an in-progress photo of a prototype. 

The photo is then transformed into a simple line drawing, with the background removed.  

Jessica has taken over illustrating the new patterns and as you can see, she does a beautiful job of capturing the essentials.  

Working together we've created more efficient and standardized methods of pattern building. 2016 is going to be a prolific year in terms of new pattern releases! 

We look forward to speaking with you at the Sewing and Stitchery expo* in Puyallup, WA the last weekend in February, in person elsewhere, or through social media.  We especially look forward to seeing your Paganoonoo influenced upcycled garments.  

As Always, Happy Upcycling!

Michelle

* Registration is open for Paganoonoo sessions at the Expo

Saturday, January 16, 2016

Paganoonoo Sandy Pattern in Watermelon Red and Apple Green

George has been in the studio, photographing garments again, Yeah George!!

Here is the Paganoonoo Sandy Blouse in watermelon red and apple green. The apple green part is from a woman's skirt that had a bit of beading.  The green on the back below the circle and the red are from men's dress shirts. I love this color combination, it's delicious.


Wednesday, January 13, 2016

Michelle Dress 2 views, ribbon on cuff...

I decided to add the ribbon to the cuff of the Michelle Dress prototype.  It was already on the waistband, but you can see in the photo below how it balances out the design to have it on the cuff.

The ribbon was a gift from a friend, stashed away a year ago (thank you Doris Pak Kim!)  I started the prototype with the green and orange shirt as a sort of "throw away" because it did not think it would look like much.

I tried pairing it with green bodice, and orange bodice and both looked bad to me.  When I tried white - BAM!- all of a sudden the bottom looked great.  I moved the orange shirt to the lower back. 

Everything was looking good (which is always more fun to work with) and then I remembered the distinctive colors of the gift ribbon and I managed to lay my hands on it!!!  The ribbon happened to be a perfect match.  The colors, the width, perfect.
This is no longer just a prototype, it belongs on someone and out in public making people smile. 


I worked all day yesterday and today on the Michelle Pattern, sorting through photos of work in progress, selecting the most helpful ones, and writing instructions. 

Buy your copy here


If you would like to see new example garments, get links to my video tips, hear about sales, new patterns and events, please click here to be added to the Paganoonoo mailing list, never sold or shared.

Monday, January 11, 2016

Cindy Blouse pattern coming soon

 Pattern work is flying in all directions as prototypes are made, photos taken, illustrations generated and instructions drafted.

In addition to the Michelle Dress, the Cindy Blouse is in progress. It will be one of the easiest patterns to date.  And it creates a wonderful optical illusion...
with a decorative front panel in an "hourglass" shape, mimicking a curvy bust, waist, and hips.

The panel breaks up the breadth of the blouse drawing the eye to the curved shape.  Ladies, this is great news for all of us, and especially for curvy girls like me!

The silhouette features the signature Paganoonoo high/low hem and loose fitting hip.

This is likely to be the next pattern released followed shortly by the Michelle Pattern.

BTW - For those of you who have already finished Paganoonoo garments please send photos!  I would love to feature your work - on the blog, on Pinterest, on Craftsy, and on Paganoonoo.com.  If you've already posted elsewhere please send a link.

As always, Happy Upcycling!  Michelle

P.S. Buy currently released patterns here.


Friday, January 8, 2016

Update - Michelle Dress Pattern

I mentioned last fall that I was working on a dress pattern, next to be published.  Where did the time go?

I got stumped for quite a while on how to illustrate and explain the complicated draping and pleating on the front.

So this week I dived in once again, thinking there has to be a way.  Eureka!  While watching vintage Sci Fi movies I found a new method. 

Here are some snaps of the first prototype. 


It is very similar to the original design, but easier to drape and to explain.  I'm outlining the pattern detail today and will keep going till it is finished, I promise!

The pockets are deep and great for carting things around while crafting and sewing, they really are the "feature".

 Women LOVE this pattern.  I get stopped constantly when I wear my earlier versions.  It doesn't exactly skim the figure but it is comfortable, playful, a bit romantic, eye catching, sweet and just plain fun. 


P.S. Buy currently released patterns here